HEADLIGHTS 101 | HISTORY AND RESTORATION
For an overwhelming majority of us, our headlights serve merely as a two-dimensional purpose, which is to improve our field of vision and to project a concentrated form of light onto anything that might be deemed a threat to our driving experience. If you step back and look at your vehicle holistically, your headlights are in many ways the focal point to the front end and can either look aesthetically appealing or downright appalling. Of course, the end result is entirely dependent on how you care for them over time. Bearing that in mind, this article is compartmentalized into two categories, with one covering a brief history of these critical components and the other serving as a comprehensive guide to restoration.
HISTORY
As an antecedent, horseless carriages of the early to mid 19th century relied heavily on candlelit lanterns to guide passengers through nightfall. Naturally, this method of illumination wasn't as successful being that roads and terrain were unpredictable, which then led from a basic candle to the graduation of oil-based lanterns.
With that era coming to a dramatic close, it was time for the world to shift its focus into other forms of light production. The origin of the first headlight design surfaced in the late 1880's with a single canister of pressurized gas known as acetylene. (H2N2), which would then flow through metal or copper tubing into either a glass or brass chamber.
When popped open from the front, each chamber would contain a small orifice by which the gas could flow, which would then become ignited with a simple match, subsequently producing a flame. Although the flame was weak and imperceptible, it was still large enough to project a small beam of light. A video below provides a demonstration of how these lanterns operate on a 1914 Chevrolet Royal Mail Roaster.
ABOVE
DEMONSTRATION ON THE OPERATION OF ACETYLENE HEADLIGHTS ON A 1914 CHEVROLET ROYAL MAIL ROADSTER
While the schematics of this technology varied slightly from manufacturer to manufacturer (because not many were available to choose from), it's also worth noting that the kerosene lamps shown above were simply a means to embellish the front-end, thus serving only of secondary importance. While acetylene was the clear winner with regard to light projection, it was also resistant to wind and rain. Within the same time period, and with the help of Thomas Edison, the industry gave birth to the first electric headlamp in 1898 by the Columbia Motor Car Company based in Detroit, Michigan.
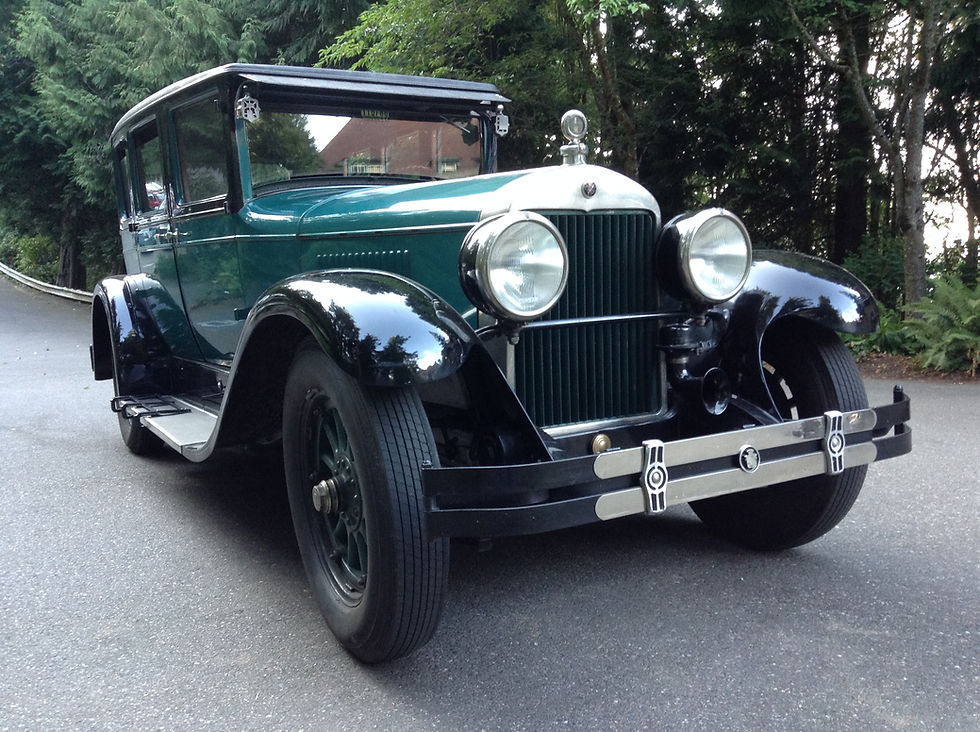
ABOVE
1920 COLUMBIA 6 (6-CYLINDER MODEL ENGINE)

ABOVE
1919 COLUMBIA MOTORS COMPANY FULL-PAGE ADVERTISEMENT MADE FOR THE SATURDAY EVENING POST
With the electric headlamp coming into the forefront of the automobile industry, it surely didn't come without its own obstacles. Much like the genesis of any new invention, filaments were weak, which in turn caused premature failure when exposed to the elements and the unstable vibration during operation. In fact, the first filaments produced were referred to as Tungsten filaments, which are still used in today's conventional incandescent bulbs. Although, much of the world is shifting in the way of LED's and energy-efficient lighting.
However, with the ineffective design and the incongruous ratio between the heavy power supplied against the small output of light generated, manufacturers found them to be cost prohibitive, which also left consumers fumed when it came time for them to be replaced. Within this same era, headlights were offered as an optional upgrade, and in many ways these upgrades were only accessible to the social elite.
While the race for dominance in the world of automotive innovation continued, a small handful of companies in the United States pushed forward with their conceptualized framework of an efficient headlight design including Cadillac, Ford, and the Guide Lamp Company. From 1910-1920, all automotive brands continued experimenting with casing after casing, to ensure that optimal light output could be reached. Well into the next decade, engineers representing companies in both the United States and abroad advanced their technologies by introducing user-friendly configurations inside the cabin, and around 1920 control board switches were ubiquitous across the board. European brands such as Daimler AG, Rolls Royce, Audi Automobilwerke, and other top-tier luxury brands took the lead in the integration of sophisticated lighting controls including low and high-beam projection, dimming features, and anti-glare capabilities. While Europe continued to forge ahead as the undisputed leader in sophisticated automobile technology, the United States observed from afar and concentrated its efforts in producing vehicles for the masses rather than subsidizing other secondary technologies. As the Ford Model T spent its time in the limelight, it subsequently left the rest of the world in a frenzy and resulted in European luxury brands to establish themselves as a higher pedigree of quality versus quantity.
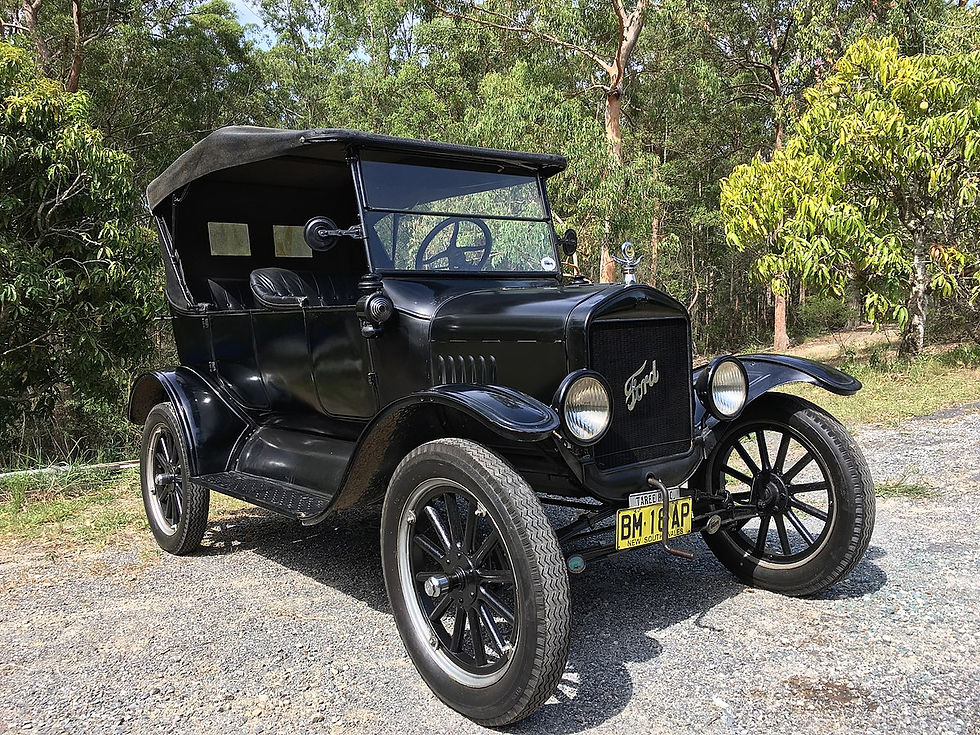
ABOVE
1925 FORD MODEL T TOURING
As the 1930's and 1940's came around, headlights of any description were standard throughout the globe. While a small departure and perhaps periphery to the world of headlamps, Buick had made its contribution to the world of lighting by developing the first fully-operational turning signal via a lever in 1939. However, original credit to the invention goes to Percy Douglas-Hamilton in 1909.
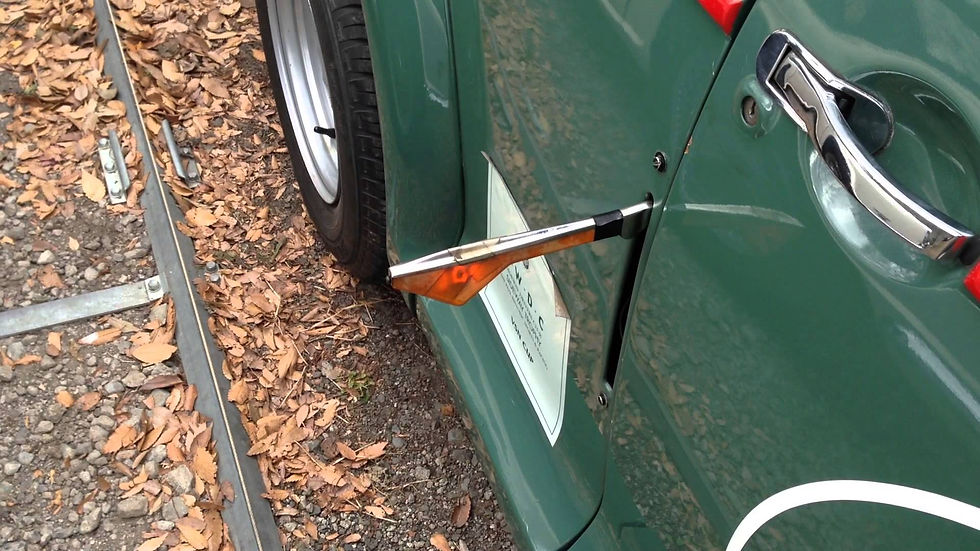
ABOVE
VINTAGE 1951 VW BEETLE USING SEMAPHORES (TRAFFICATORS) TO INDICATE A TURNING SIGNAL
As technological advancements continued, so did reflector designs and stronger filaments to increase projection and ease of maintenance for all drivers. With the world ushering-in the sealed-beam headlight in 1939, stronger forms of glass were used, which not only shielded the outer casing from unwanted contamination, but like anything else, it had its disadvantages. First and foremost, sealed-beam headlights were comprised of one piece, which meant that you couldn't simply change the bulb. Secondly, with the housing being made of 100% glass, it was susceptible to shattering if not handled properly. Nonetheless, this was the preferred method of headlight innovation, especially since the world was recovering from WWII and other ongoing conflicts overseas.
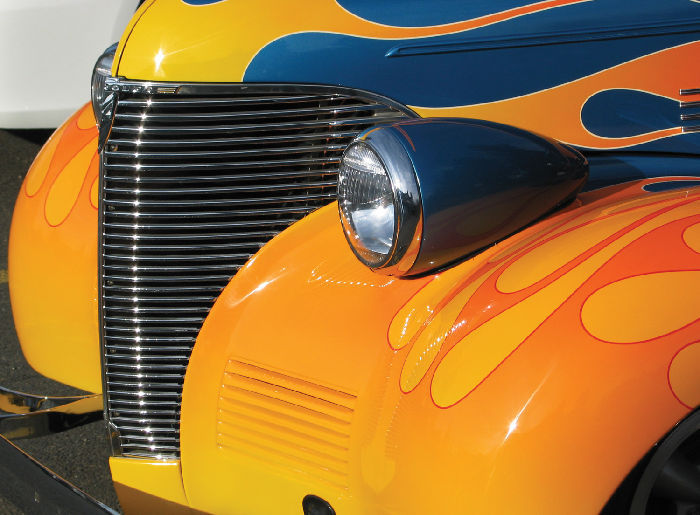
ABOVE
ILLUSTRATION OF A 1938 CHEVROLET COUPE WITH 7-INCH SEALED BEAM HEADLIGHT
By the early 1950's, newer innovations made their way center stage including power steering, power brakes, fully-integrated tail lights, and the introduction of the first halogen headlight. Not only were halogen headlights resistant to high temperatures, but the lifespan of each bulb greatly surpassed that of its predecessor. Due to popular demand in the Western hemisphere, headlights were now considered an automated feature in most vehicles, and from this point forward engineers could hone their skills.
The development of low-beam and high-beam designs continued, and while halogens were somewhat of a new idea, not to mention being exclusive to only luxury brands at the time, the extreme dichotomy of rural versus urban living made the American driving experience more relevant than ever. In response to this explosion in American socioeconomic expansion, halogen bulbs were no longer out of reach for anyone on the road.
While there weren't many notable changes in the way of headlight design or light output, the 1970's gave way to federal regulation, and as such, the NHTSA (National Highway Traffic Safety Administration) took over with regard to what was compulsory. Thankfully, the HID or (High Intensity Discharge Lamps) muscled their way into the market, and it was during this time that light output exponentially increased and the driving experience went from bright to brighter. The fundamental difference between the long-standing halogen and the HID is that the while both emitted a great deal of heat, HID light would generate 30-40% more light onto the road ahead, not only to enhance the driving experience but was also 20-30% more efficient with regard to its lifespan. Make no mistake, each category still generated a great deal of heat to operate, but HID's were twice as bright and delivered just as much, if not more efficiency.


ABOVE
LEFT (HALOGEN BULB) | RIGHT (HID BULBS)
NOTE THE DOUBLE FILAMENT CONFIGURATION PRESENT IN THE HID VERSUS THE HALOGEN
In the not-so-distant future, the 1980's invited a host of new technologies, but one of the most influential was that of polycarbonate plastic housing. Up until the early 80's, glass had been the primary housing used in headlights, and with the new facelift of polycarbonate taking the lead, it allowed for retrofitting, extreme resilience to the elements and other unforeseeable projectiles, and is now the current form of headlight housing on modern-day vehicles.
Last but not least, and it should come as no surprise, European manufacturers still lead the way with respect to light-emitting innovation. With BMW flexing its innovative prowess with its Laserlight technology, the "Ultimate Driving Machine" surely accomplishes yet another feat and continues to serve as a shining example of what the automobile world is capable of producing. No pun intended, of course. Unlike that of any other traditional bulb, their Laserlight technology emits an intense beam of laser-light through a series of strategically placed mirrors. From this point, this light then focuses its energy into a lens deep within the casing which then reacts with small films of yellow phosphorous. Once all of these elements react, an intense, bright, white light then projects and extends almost more than 300 feet. Interestingly enough, some current models gain an additional 200-300 feet.
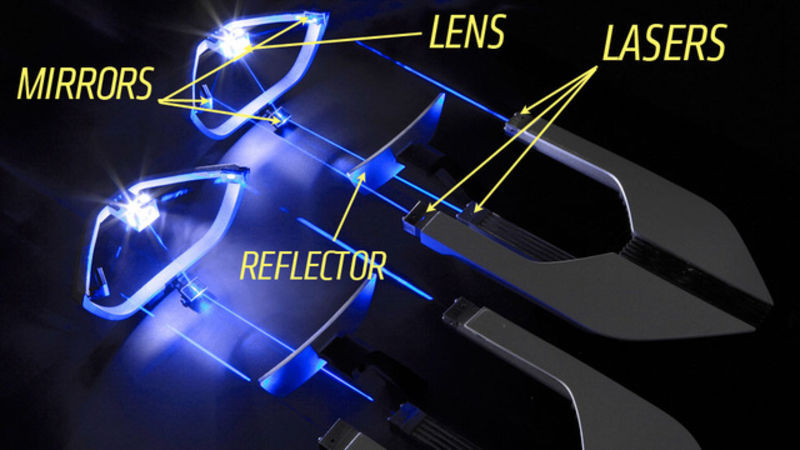
ABOVE
EXAMPLE OF BMW'S SOPHISTICATED LASERLIGHT TECHNOLOGY

ABOVE
ILLUSTRATION OF BMW'S NEW LASERLIGHT HEADLIGHT CASING AS SEEN FROM THE EXTERIOR
BMW suggests that the technology increases light efficiency by almost an additional 30%. If that weren't impressive enough, they're already perfecting adaptive lighting capability, where GPS functionality alerts the driver by anticipating where future hazards may pose a threat (wild animals, pedestrians, and any other potential obstruction), thus adding to the much-needed cache of safety-enabled features. So, in many ways, we've come full circle with innovation that comes at a hefty price tag, but we can only hope that in time the most sophisticated lighting systems will become universal and available to the masses.
RESTORATION
Restoration of any kind can cover a wide range of applications, and the beauty of restoring headlights is that it can either become a short or long-term solution, depending on the driver's unique set of circumstances and desires. Although, being that short-term solutions are more or less a temporary "band-aid", I tend to favor a long-term solution versus a transient headache. Make no mistake, there's an assemblage of how-to-guides across the internet, and while some offer a sense of legitimacy, others are simply questionable and only promote a cash-grabbing enterprise. Without further ado, let's cover two guides to headlight restoration, one which covers glass while the other covering the modern headlight casing, or polycarbonate plastic. Prior to executing any of these methods, ensure that you mask-off the area around your headlights so you don't run the risk of inadvertently causing undue harm to your paintwork.

GLASS
Much to the vexation of any older vehicle (any vehicle produced before 1981), glass headlights only have a handful of legitimate headlight restoration practices, and in an overwhelming majority of cases, any remedy will be temporary which will inevitably lead to purchasing a new pair.
First and foremost, much like that of any other detail-related project, you need to assess the condition of the headlight in its entirety before proceeding. What do I mean by assessing? It's not enough to assess the headlight from the outside, because in some cases oxidation, pitting, and excessive marring could be present within the housing. So, if you should encounter a worst-case scenario, learn to manage your expectations accordingly and realize that perfection may or may not exist.
My recurring theme with any blog or how-to-guide is that of using the least invasive method. So, with that in mind, ensure that the headlight you're working on is clean in every conceivable way. Perform a thorough wash, rid the surface of any stubborn contamination with a dedicated clay bar treatment and/or a separate regimen of an iron and mineral spot remover.
If you're working off of an endless budget (assuming you're either a DIYer, passionate enthusiast, weekend warrior or a full-time professional) and you're only suffering from topical deterioration (minimal oxidation, mild to moderate scratching, etc.) you can use your trusted orbital or rotary and proceed with a medium-cut compound to bite enough into the failed polycarbonate. Please note, in order to achieve superior results, make sure you employ the use of either a wool or microfiber pad so the combination will pierce through any rough areas. With a cross-hatch pattern, continue working the compound into the effected area until you've achieved 5 cycles (up/down and left/right).
While any form of a finishing pad might suffice, I tend to favor the use of an open-cell polishing pad, simply because it tends to finish aggressively. Since we're dealing with glass versus polycarbonate plastic, it's imperative that you use a combination of both an aggressive finishing pad and a light to medium-cut polish. If this combination doesn't produce results, then repeat the process by using a coarser compound coupled with the same variety of polishing pad and finishing polish.
If you should discover any marring from the interior of the lens, then it's time to perform invasive surgery by splitting the lens open. If you should possess a pair of classic headlights, you'll more than likely find a set of screws that adhere the lens to the casing. If not, then the lens is held together using an adhesive that can only be split open by introducing extreme heat by way of a conventional oven. With an oven set to 200 degrees for 15 minutes, stick the headlights on a rack positioned in the middle for equal heat distribution. Once completed, the adhesive will give way and either a flathead screwdriver or plastic prying tool can be used to pull apart the lens. Please note, you'll only have a window of 5 minutes before the old adhesive solidifies again, so be sure to work quickly and with extreme care so as not to compromise the plastic clips that allow the casing to form a watertight connection.

After the polishing stage is complete, assess the condition of the headlight to ensure that clarity had been achieved on both the exterior and the interior of the lens. Please don't reach for an over-the-counter can of aftermarket clearcoat aerosol because irrespective of the environment you're working in, there are too many variables outside of your control and the beam pattern will suffer once installed (not to mention other eyesores including orange peel, uneven applications, and premature failure). Again, you're relying on the hands of a human versus the flawless precision of a robotic hand.
Finally, we move on to the protection aspect of your headlight restoration. Once you're satisfied with the results of your restoration, you have several options at your disposal, but if you're of the long-term persuasion as I am, you'll reach for a form of PPF (paint protection film) followed by an application of a protective coating. While you may not need an entire roll of PPF, it will most likely be cost-effective to choose pre-fabricated kits that already When coupled together, you're ensuring the highest form of resiliency against the elements, along with the ease of maintenance as it continues to age.
POLYCARBONATE PLASTIC
While many of the steps mentioned in the first method apply to polycarbonate plastic, you should also be cognizant of your particular manufacturer, because generally speaking, imports of any description typically have a thicker membrane of polycarbonate, and in some cases, even the heaviest-cut compound won't rectify moderate to severe oxidation. If this is the case, a multi-step wet-sanding process is your only recourse.
Again, if the oxidation is severe, then you need to employ the use of various grits of wet/dry sandpaper. While it may be confusing to understand the nuances of using wet/dry sandpaper, there's only one rule you need to abide by. The higher the grit of sandpaper used, the finer the scratches the sandpaper will produce. Your first stage of grit will focus on eliminating the failed polycarbonate, or any oxidized portion, while any following and subsequent grit will refine and mask any of the initial scratches produced from the previous stage. Think of the initial stage as if you were exfoliating your skin; removing the dead skin is your first point of action. At the end of the day, your goal is to refine the lens as much as possible so that by the time you reach the final stages, any scratches left from the wet-sanding process will become virtually non-existent.
A failproof method is to work in increments of 500, beginning with 1000 grit. Much like any other detail-related project, be sure to use the least-invasive method first. If necessary, you always have the ability to revert back to a stronger grit in case the initial stage isn't strong enough. Next, wrap a portion of your 1000 grit coupled with an interface pad or a sponge-like padding to ensure equal distribution of pressure. Rest assured, no additional force needs to be applied, so take comfort in knowing that only the weight of your hand is necessary to get the job done.
While you graze the sandpaper across the lens from left to right, make sure to keep both your lens and sandpaper saturated with water. If you have time, soak any grit of sandpaper for a period of 30 minutes in a bucket of clean water. Lubrication of any kind will help facilitate the process. After roughly 3-5 minutes, wipe the lens dry with either pressurized air or a clean and dry microfiber towel. Once dry, you should see a universal opaqueness across the lens in the aforementioned direction. If any area of the lens is still somewhat clear, then you need to continue the process until all areas of the lens are of the same opaqueness.
Once the first stage is complete, follow with 1500 grit, but rather than moving from left to right, move up and down. By alternating the direction of the sandpaper, you're ensuring that all subsequent scratches blend together, which in turn will guarantee a smooth finish before the polishing stage. Continue to follow the same procedure with any remaining grit, and once you reach 3000 grit, you'll notice that the lens will start its transformation in becoming clear.
To finish, apply a conventional compound coupled with a microfiber cutting pad at a speed setting of either 4-5, followed with a finishing pad and polish at a speed setting of 3-3.5 to maximize clarity and brilliance. If you should have headlights that carry a unique styling with various crevices and hard-to-reach corners, you might need to either employ the use of good-old-fashioned elbow grease or a smaller specialty polisher (iBrid Nano, Griot's Garage G8, etc.) That is, if you're already familiar with the operation and accessories that come with each relative unit.
It's important to understand that with the amount of labor and time you dedicated to this process, you've already stripped the UVA/UVB coating that once existed from the factory. Without protection, you can expect the refurbished headlight to last for no more than a month, perhaps a bit longer if kept in a sheltered location. As a quick addendum, polishing of any description can be repeated anywhere between 4-7 times, depending on coarseness of materials used to refurbish the headlight. Yes, you heard that correctly. Believe it or not, modern-day polycarbonate plastic is more resilient than you think. So, if you aren't able to achieve the results you desire the first time around, you have plenty of opportunity to start over. A telltale sign of a headlight that has reached the end of its life-cycle is what's referred to as a "headlight stress fracture". After a headlight has been polished a handful of times, you'll most likely notice infinitesimal cracks within the headlight casing. When this happens, you've reached a point of no return and you'll need to replace the headlight altogether. So, heed my warning by measuring twice and cut once, so to speak. Below is an example of a headlight stress fracture.

ABOVE
ILLUSTRATION OF A HEADLIGHT STRESS FRACTURE
However, as stated earlier, anyone who covets their vehicle should have a natural proclivity for finding a long-term solution. As such, you can begin by installing PPF, which carries strong UVA/UVB inhibitors, not to mention shielding the driver from any further pitting, scratching, or other forms of contamination. Prior to installation, ensure that the headlight had been stripped of any residual oils leftover from the polishing stages with a simple wipe of 70% Isopropyl alcohol with a clean microfiber towel. If you should skip this stage, the PPF won't adhere to the lens properly and will inevitably lead to lifted corners and premature failure.
Once you've installed your PPF to each lens, you can give yourself the peace of mind by applying a protective coating on top. By doing so, you'll add an additional layer of UVA and UVB inhibitors, along with an ease of maintenance when it comes to a routine exterior wash.
Below, you'll find a set of links which should supply you with all the tools and resources necessary for a successful headlamp refurbishment. If you should have any questions or concerns, please don't hesitate to contact me and I'll be happy to assist. Enjoy the world of headlamp restoration.
TOOLS AND RESOURCES
MICROFIBER TOWELS
WET/DRY SANDPAPER KIT
COMPOUND
POLISH
MASKING TAPE
PADS
LAMIN-X PROTECTIVE FILMS PPF KITS
ISOPROPYL ALCOHOL


Comments